WIP guide, if ive got any information wrong or you feel more detail is needed in places, please do message me and i’ll update the guide. I will also continue to refine and add more detail to the guide, but the core parts, such as reading the radar range display are covered quite well I think
I’ve done this guide using the B-Scope or the “rectangular radar indicator” as I pesonally find it much more user friendly than the PPI mode (the semi-circle display), but all this information is also displayed on the PPI Mode, its just not as clear in my opinion.
If you want more information on how radars function generally, or information on different radar modes, then I would check out the wiki page.
Radar Range Display
The best way to know whether a shot is worth it or not is reading the radar:
On the B-Scope display (the square radar panel) on the right hand side is a set markers that will tell you all you need to know about whether or not the target is within range and its worth firing
Line 1 is your minium range (or rMin). if the target marker is below this point, the missile will be unable to hit the target, less of a problem for more modern missiles, but well worth keeping an eye on for older ones
the Box labeled “2” is your LSZ (launch success zone) or NEZ (no escape zone) (varies for different air forces but its the same thing) A missile fired within this box is incredibly difficult to defeat kinematically, the target will be required to actively defeat the missile, even turning cold wont necessarily be enough to defeat a missile fired within the LSZ
Note, the LSZ boxes can be buggy, especially at high alt and can sometimes appear to exceed the rMax, this is impossible, so do be warned, but generally can be trusted
Line 3 is the targets current relative range on the scale, if this line is within the LSZ box or close to it, generally its a good idea to attempt to fire the missile.
Line 4 is your maximum range (or rMax), this is the maximum theoretical range of your missile, but just because the target is within range, it doesnt mean that a shot is worth while firing, only that if the targets fails to do anything, the missile should hit. Its definetly worth paying attention to this for shorter range weapons like the Aim-9M.
So to summarise, try firing the missile whilst it is within the LSZ on the B-Scope and you should have greater success hitting the target. This range display is found on most aircraft and most weapons. But LSZ box is not modeled for all weapons.
The ranging information is dynamic, meaning it will factor in both the launch conditions and what the target is doing. Firing faster and higher will greatly extend the range of your weapon and this will be displayed on your rMax and LSZ. Likewise, if your target is flying away from you, then the conditions shown will be greatly different to the target flying towards you. This means you can use this display dynamically, to evaluate when it is best to fire.
Additional Advice for maximising missile effectiveness
Also pay attention to what the target is doing. TWS will give you the targets heading, if its traveling towards you, then it will be harder for them to defend than if they were already in a notch and if they are turned like that, then they wont be able to fire straight away and you can safely get closer. Control the fight. If they’ve been flying back and forth, they have probably drained a lot of energy and thus a good target to fire at.
A target at a very high alt will also struggle more to get into a notch than one at sea level and I personally find control surfaces can get a little… squirelly. So a target at very high alts may struggle to defend far more than one low, so these targets are usually ones I tend to single out
As a final piece of advice, try to help the missile as much as possible, leading your shot helps massively, the game already provides a lot of help with this, aim for the circle and the missile should have the easiest time. You can also raise your nose 15-20° and loft the missile slightly which can help too.
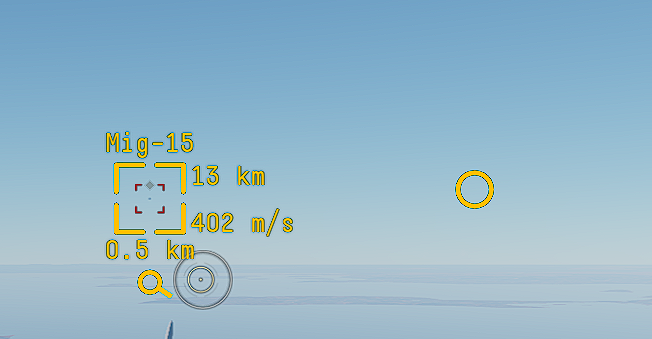
Missile Symbology
Being able to read what your missile is doing after you fire is just as important as reading the radar to determine when to fire.
In the image above, you can see a Fox-3 (ARH) missile launch at a target.
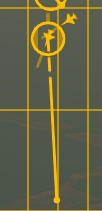
The small dash above the contact means the missile is able to receive data-link (DL) updates. This means your radar is able to actively provide information to the missile and will aid greatly in the missile hitting the target. But just because the missile can recieve DL updates, it doesnt mean it always will. Once the missile has gone active (entered TRK) the missile will stop accepting DL inputs. If the missile loses track of the target, then DL can re-enable, this includes when the target notches, meaning if you can, keep the target on radar all the way.

A clearer image of this dash
The circle around the target means the missile is utelising intertial onboard Guidance (IOG) (or for newer missiles, GNSS) to guide towards the target. This means the target is guessing where the target will be based upon its last known information.
When the missile is in IOG, it will be suscepitble to IOG drift, which wastes energy correcting back onto the target. A missile with GNSS has no such drift
Both of these symbology can occur at the same time as seen in the first image, meaning the missile is currently guiding on IOG + DL.
The solid line denotes your missiles active range (where it will enter TRK), once the missile has entered this range, it’s own seeker will take over and the target’s RWR will begin pinging MSL warnings. It is also typically when the missile will stop listening to DL. Though it is worth maintaining radar track even during this stage, as the DL will re-enableif the missile loses track of the target and switches back to IOG and/or DL.
The broken line is the area where the missile is reliant upon DL or IOG to find the target. Its main purpose is just to denote which target your missile is going for.
IFF
IFF symbology is highly critical to pay attention to, even in gamemodes where you have friendly markers, as to avoid accidentally firing a missile at a teammate. Recently added IFF filters make this even harder to accidentally do, but it is nonetheless important to know. Additionally not all radars have IFF filters, and all targets may appear as hostile.
Friendly targets in all modes are identified by a single horizontal line above the contact

Friendly NCTR TWS contact

Friendly TWS Contact

Friendly SRC contact
For PDV modes, the line will appear at the top of the screen, rather than above the contact, so be mindful of this.
Hostile targets will appear without this horizontal line.
Once the target has been selected, 2 vertical lines will appear either side of the contact.

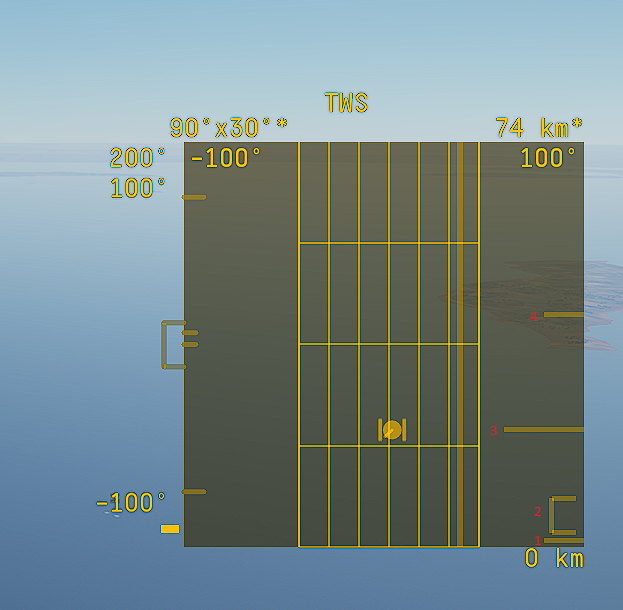
Elevation
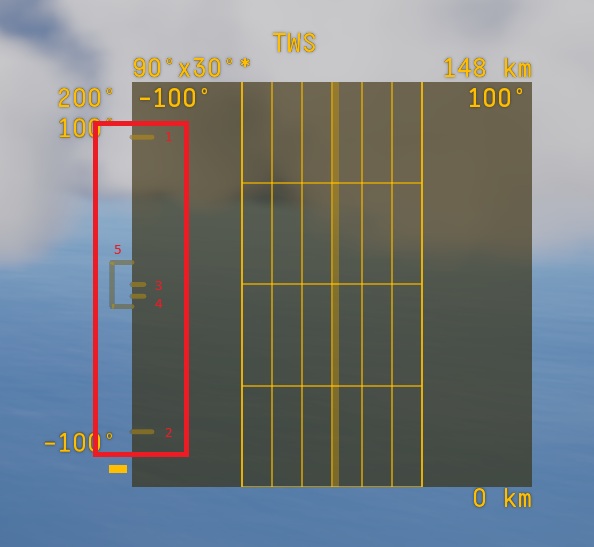
The elevation display is shown on the left hand side of the radar screen, this indicates where you radar is pointing vertically.
Line 1 is the maximum positive elevation of the radar
Line 2 is the maximum negative elevation of the radar
Line 3 is the centre point (the radar pointing straight ahead)
Line 4 is where the radar is currently scanning in regard to elevation and will move up and down within the scan zone
Box 5 is the current scan area.
The elevation on radars can be adjusted either use Alt+left click to drag the search area up and down or via keybind. This is very useful both in lookdown situations but also when flying low, and adjusting the radar to be pointing up slightly, which cuts out on some ground clutter.
Scan Area
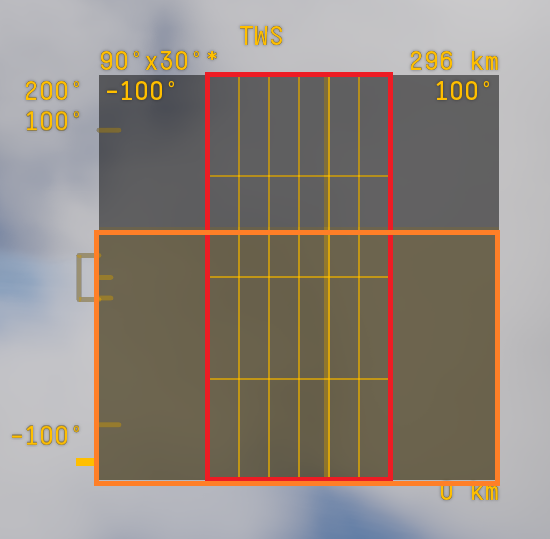
Scan area is simply the area where the aircraft can actually detect another aircraft.
The darkened area of the radar screen (the area above the orange box) is the area in which your radar can detect but cannot lock another aircraft.
The red box is where your radar is currently scanning, this can be moved left and right.
Ground Clutter
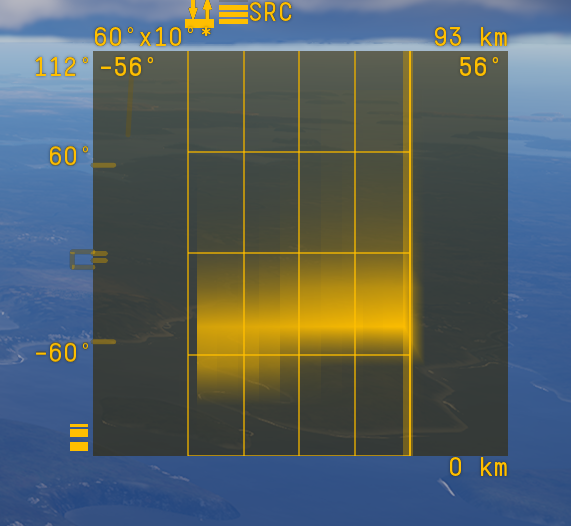
Ground clutter occurs in certain scan modes when your radar can see the ground, this will appear as large blotchy areas on the screen and detecting aircraft flying low within ground clutter is very difficult.
The intensity of the ground clutter is also displayed at the top of the screen and denoted by this symbology

Misc Symbology
In the bottom left corner is 3 small boxes, these denote your current IFF mode. If all 3 boxes are present, you can detect both friend and foe. the bottom box on its own denotes only hostile. The top box with the line above denotes only friendlies.

It is quite common to accidental swap between IFF modes on the radar, so being aware of this symbology is quite useful to know what mode you are in at a quick glance.
