- Yes
- No
EDIT: Jun 18 26
Reason: Grammar, Brevity, Extra detail, and post Nuclear Thunder release adjustments.
NOTE: This is v2
I present you…
Ground Operations
Match Length: 2-3 Hours (Whatever Nuclear Thunder is set to)
Entire Map size: 200km x 200km
Ground playable size 15km x 15km (25km x 25km SPAAs)
Spawns: Silver Lion based spawning (Enduring Confrontation)
NPCs: SAMs, SPAA, Light Tanks, MBTs, Heli, Bombers, CAS, Logistic trucks
Win Condition: Bleed tickets by capturing or complete base destruction.
Allowed Vehicles: Any Air and Ground
TLDR: This is a ground game mode that adds structures and objectives that dynamically change the game. It takes the simplicity of taking points for the ticket bleed and adds in multiple objectives that can change the outcome of the battle. Bases contain critical structures that keep the team alive. This includes NPC offensive and defensive units/structures. In this version, I have combined my initial idea of Ground Operations with the current iteration of Nuclear Thunder.

This is a complex game mode, so I will break it down by chunks.
Part 1: Frontlines
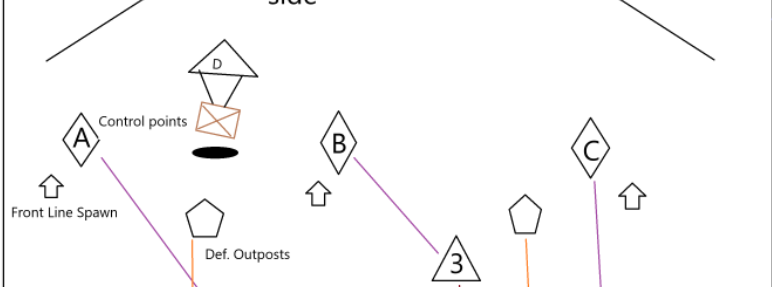
Let’s start here. This is the main area where everyone will probably be.
Control Points:
This is the standard thing we deal with all the time, so nothing really needs to be explained.
Front Line Spawn:
This will be linked to the control point. Players can spawn here to protect the control point that they fought hard for.
Why is this here?:
Given the map’s size, I want players to be constantly engaged. So this is here to both protect the point or use it as a spawn to assault the enemy bases.
D Point:
This is a randomly spawned airdropped objective. This will be randomly generated and can change almost anything. It will be labeled to give players a reason to go for it as soon as it is announced.
Examples: Repair any structure, double NPC production, structure outage, NPC CAS/CAP, Ammo shortage, jam radar…much, much more.
Imagine this: Two teams in a stalemate, there is a no-man’s land in the middle. The point is not captured. D Point appears 3 km away and contains NPC CAS. So the teams have a chance to change the situation. They can take the risk and split up to control the point or stand their ground and try to push the enemy to take the objective. Team A captures the point, triggering NPC CAS.
Part of my philosophy of this game mode is constant action. So this opens up many opportunities and triggers a cascade of defenses and choices for the players to make. So in this situation, the NPC CAS will carry advanced munitions to increase lethality and incentivize players to get the point. A fleet of NPC high-tier aircraft spawns in and will fly over the battlefield, launching various precision weapons. Now here are the opportunities to respond to the CAS situation. Players can split up and spawn in a plane with AAMs or spawn in a SPAA. If no players take action, the NPC defenses will take action. The systems have full capabilities like a player and have priority targets. For example, NPC CAS spawns in and activates long-range SAMs to shoot down the aircraft. Since these facilities can be destroyed, let’s go down the line of defenses that will trigger. Medium-range SAMs can be activated to target either aircraft or munitions. Next is the AAAs/SPAAGs. This is the last resort, but still very effective. This focuses on low-flying aircraft and munitions of any size.
Part 2: Attack, Defend, and Supply
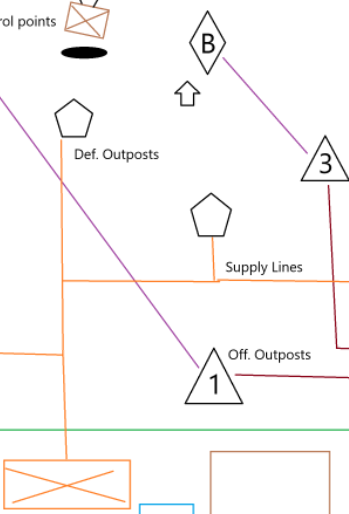
Offensive Outpost:
These are neutral points that can be captured by any team, and there are 3 of them; each one has its own tier and certain tech it unlocks when captured. So the use of this area is important for everyone. Additionally, this will be a spawn point for NPC offensive vehicles with a goal of taking over a control point.
Balancing:
Defense Outpost: This contains NPC structures, emplacements, and vehicles. This area is a major point of interest, powerful enough to push back the enemy. This can contain bunkers, TOW emplacements, and static vehicles that just defend the area.
Supply Lines:
This is the life and blood of the outposts. It contains a constant flow of NPC-controlled logistics trucks that keep the defense and offense outposts maintained and full of ammo.
Offensive Outposts:
This is the main facility that allows players to access more advanced weaponry and spawns more NPCs to help invade the enemy. These outposts will start sending waves of NPCs to try to take control of a point.
Note: NPCs that spawn will only come from the captured outpost, but will upgrade themselves when the other points are captured. They will randomly pick different vehicles and start sending them to the assigned capture point.
OO-1:
Weapons available: AAMs,
Vehicles available: Helicopters, a limited list of Aircraft
NPCs Available: Light vehicles, SPAAGs, Light Tanks, AT Vehicles,
OO-2:
Weapons available: Rockets, Bombs
Vehicles available: All Aircraft
NPCs Available: Early - MBTs, SPGs, SHORADs, SAMs, Helicopters
OO-3:
Weapons available: Smart Munitions and everything else
NPCs Available: Advanced MBTs, Advanced Helicopters
Imagine this: From the previous situation. The CAS took out the defenses of the A point. They are vulnerable to an invasion. The enemy has all 3 outposts, and a large force is inbound to the A point. Since all 3 are captured, the invading force has full strength. It consists of 5 SEPv3 Abrams, 2 M3A3 Bradleys, 1 ADATS, and 2 Apaches.
Part 3: Supply Chain and Command Structures:
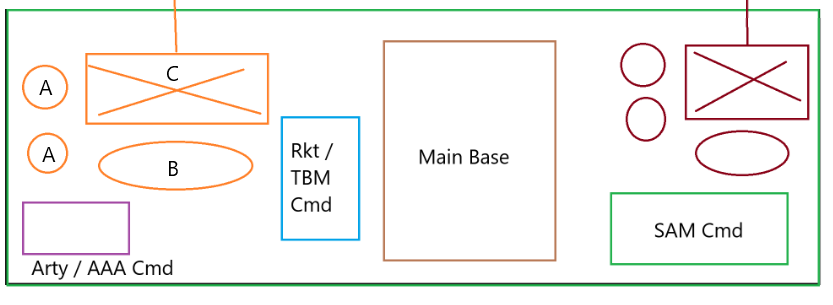
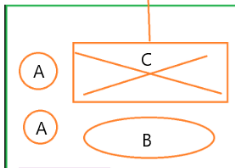
The entire green rectangle is the team’s Forward Operating Base. This contains the critical structures and systems of the team. ALL STRUCTURES can be fully repaired by any teammate.
The Cmd buildings are command centers that serve as backup systems, relay stations, or command-and-control centers.
The Cmd structure controls systems outside the ground map. Example shown below:
NOTE: TBM = SRBM Wrong terminology.
Arty / AAA Cmd: Player can call in an artillery strike wherever they want.
Rkt/TBM Cmd: Call in a rocket artillery strike or a large ballistic missile to hit any target.
SAM Cmd: Acts as an additional radar system in case the radar in the rear gets destroyed.
Players would be selected via an opt-in prompt that appears on screen. When the timer ends, a player will be randomly selected to command the artillery cluster.
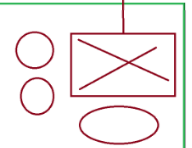
The images above are the structures that control the flow of supplies to the outposts.
Object A: These are Fuel Silos, and they control the overall speed of the trucks to their assigned locations. Each one destroyed drops the speed of the convoys by 30%.
Object B: This is the ammo depot of the facility. When active, it includes maximum ammo fill in the trucks for the outpost systems. If destroyed, the reload will be equivalent to 1/4 of a full box of extra ammo. Same as the buildable boxes that SPAAs get in GRB
Object C: This is the Motor pool. It is the main building that spawns the trucks. When destroyed, it will completely stop spawning them and cut off supplies to the outposts until it is rebuilt.
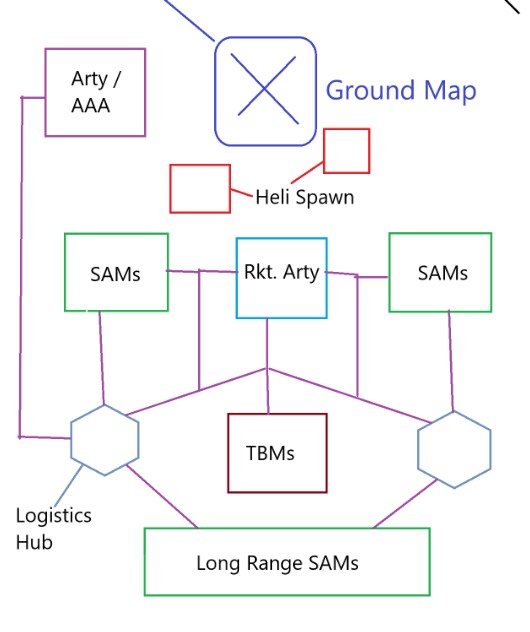
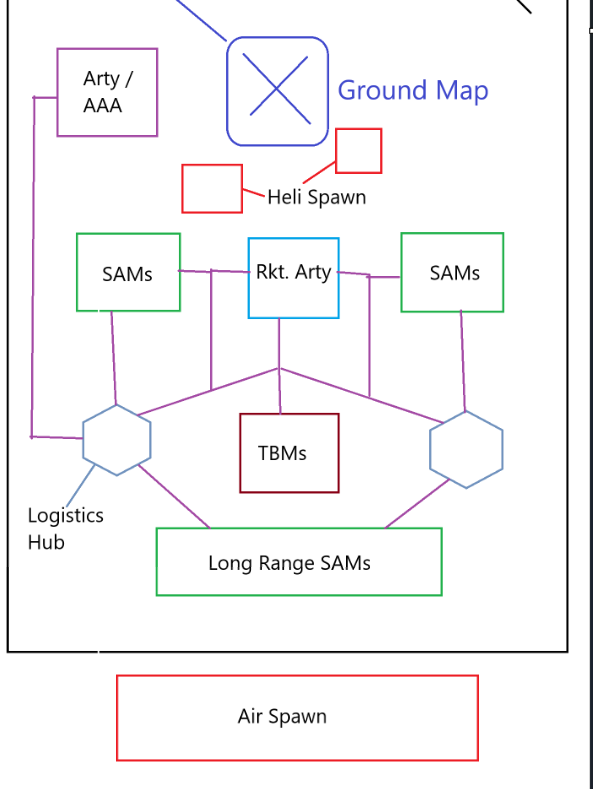
This is a more detailed look at the facilities that support the team. All of these will have their own supply chain and can also be fully destroyed. It can only be repaired via D point capture. The logistics hub is responsible for repairing and maintaining the cluster of systems.
Arty / AAA area.
Contains: SPAAGs, CIWS (will be moved closer to the main battlefield due to range), SPGs,
Purpose: Conventional artillery for bombardment, munition interception or low flying aircraft
SAM area:
Contains: SPAA, SAM sites, and Radars for multi-vehicle SPAAs
Rkt Arty area:
Contains: MLRS systems.
TBM launcher (Mislabled it. It should be SRBMs).
Contains: SRBM launchers.
