Hi folks!
As I assumed when I first heard about it, the new “Aiming Point” feature is a very promising new feature, and fun to use not only for aiming GNSS weapons and stuff in swarms, but also for simple selection of mission targets, but also navigation!
So far, since the patch dropped I’ve only found time to play two Sim EC matches, and used the Tornado Gr.1 to try out the new feature, and would like to share my findings and ideas on how to best use it in Sim.
Commands
The full range of the Aiming Point mechanic can be configured with a lot of commands, but basically I have found that only a few of them are actually necessary (unless you want to assign GNSS weapons to Aiming Points as well):
- Add / Delete Aiming Point
- Select Next / Previous Aiming Point
- Link Point of Interest to Aiming Point
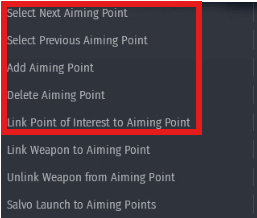
The other commands are not really important - again, if one doesn’t want to assign several weapons to several Aiming Points.
Target selection
The Aiming Points are useful for easy selection of Mission Targets: Who doesn’t know the situation: You intend to bomb a specific target, an while en route, someone else kills ist, so you have to select and mark another one to engage…
With Aiming Points you can mark up to 10 targets, and easily switch between them in flight. It’s a good idea to do that when one has free time and is not in danger, e.g. on the ground, during longer approach legs, and such. You can then just toggle through all your Aim Points, and select the one you want to attack with the [Link Point of Interest to Aiming Point] command.
And very handy: Once you’ve done that, and toggle through the Aiming Points you’ve set, the Point of Interest (and thus also Targeting Equipment and Weapon Seekers) switch to the next/previous target as well !
As with SPI marked on the map, marking the correct spot is a bit fiddly, and it’s best to zoom in to mark as precisely as possible. One can of course then also fine-adjust the aimpoint while attacking, with Targeting Equipment, but marking on the map can be done well enough on the map alone, if zoomed in…
Note that the Aim Points you’ve set remain during a match, as long as you don’t respawn after a crash or after switching vehicles.
A little yet unresolved issue: In desktop mode one can click and move around aimpoints on the map, but in VR mode, that is currently not possible due to a bug. But as workaround, if you have set [Link Point of Interest to Aiming Point], and mark another Point of Interest, the Aiming Point assigned to the PoI also jumps to the new position!
Navigation
Now all this described above can also be used for basic navigation!
I actually enjoy this very much, e.g. in the Tornado: While still on the ground, I open the map and add Aiming Points I want to use for navigation, and of course as target(s). In flight I then toggle through the Aiming Points (again, with [Link Point of Interest to Aiming Point] activated…), and when I also have e.g. a bomb selected, will get the steering cross on the HUD and the position marked on the MFD map (of course, depending on how the aircraft is equipped):
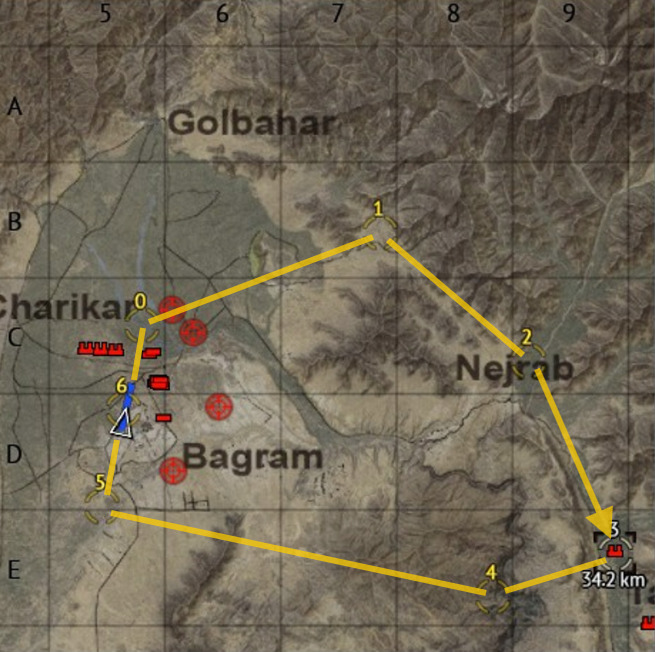
This an example of how this could look (note the yellow lines I pasted in - they’re of course / sadly not in the game…).
Also here a little caveat: While in some aircraft (e.g. Hornets, AMX,…) the PoI is always indicated on the HUD, in other aircraft (e.g. Tornado), the PoI is only shown on the HUD if a weapon that can use it is selected. That means that in those cases, once you have dropped all corresponding weapons, you will not see the marker on the HUD anymore.
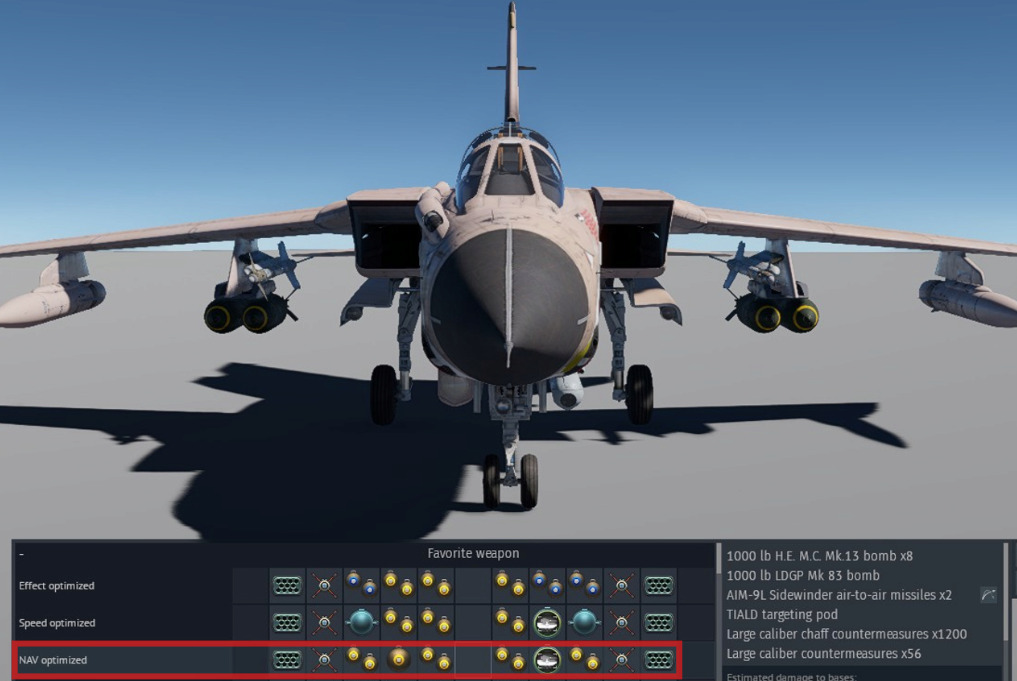
However, for the Tornado Gr.1 I’ve found a simple solution for me: I load 8x 1000-pounders Mk.13’s (enough to kill 1 mission target with a single drop), plus on the forward belly racks the TIALD pod (for fine-adjusting the PoI if needed) and a single Mk.83 which I don’t drop. Like this I will carry a bomb around that I don’t need, but will be able to use the Aiming Points for navigation until landing!
I am fully aware a lot of what I describe above is not necessary - but it’s fun to do!!!