I haven’t used the drag bombs much, but they should work with CCRP. Are you attempting to loft with them?
What release method are you using? Bomb series or Weapon Selection?
I haven’t used the drag bombs much, but they should work with CCRP. Are you attempting to loft with them?
What release method are you using? Bomb series or Weapon Selection?
I did just attempt a loft-attack with drag bombs against an Airfield and they did all appear to miss. So when used in this manner. Im going to assume CCRP cannot handle lofting the drag bombs. But I have used them succesfully in a level flight using CCRP. If some are missing, then I guess its the bombs being released sequentially over a larger area than the target. So perhaps try a ripple mode or bomb series mode that releases them all at once.
So, how will I know the target selected is the correct one? You said there will be a “line or cross” I don’t know the specific one for the AJ37, but I assume it will be similar. But how will I know I have the correct selection?
I have no experience with the AJ37 so I dont know what the CCRP symbology will be for it. (there is a chance it may not have any CCRP symbology for the cockpit, some aircraft have CCRP but limited to no symbology for the cockpit HUD)
You should be able to check though, if you point your aircraft at the ground and hit “activate target point” you will create a CCRP target point and you should see the symbology you are looking for (make sure you are in bomb (auto) though to see it.)
Knowing whether you have selected the right target or not though is very difficult and many want an overhaul of the selection method to improve it. As a general rule of thumb though the first 12-20 will be the AFs (4 targets per airfield, so 4x however many airfields there are, maps are always symetrical in that regard)
After that, it should be bases. (note it counts from 0)
Alright, thank you, I have tried in game to figure out how to use it before this, it shows a symbol, but I don’t know if that’s the correct symbol, it uses a “dot and comb” so I assume the “point” selection would be a ring to go around the dot. I have a manual here which might show one of the many HUD displays if it helps you visualize it. See page 13-16. It is the lower half of page 15 to be specific.
In game however, it doesn’t look the same as this one historically. In game it is more like the ones on page 13.
That a current reported and known bug. I think they’re working on it…
Another way to aid selection of the desired target is to do it at the airfield, before take off. You have access to external view while you’re stationary on the ground, so you get the vertical green line through the selected target showing up in the 3d world. As it can be awkward accurately guessing how many degrees the line is left/right of your nose, and then visualising that guess on the map, it’s best to confirm by taxying to point at the line (get the HUD symbology for a good alignment) and then see that you really are pointing at your desired target.
Beware of other targets on the same bearing, either further away or maybe closer. Even if there are none marked on the map, it is still possible to select targets on an enemy airfield which has not yet been ‘discovered.’
Yes, problem is however if the base you selected is attacked or destroyed while you fly there…
Don’t guess!
Measure!!! = )
I’ve created a practical helper for exactly that, see here: WT Live // Location by Schindibee (warthunder.com)
You basically just count grids and half grids between you and the target, and can easily read the heading off the table:
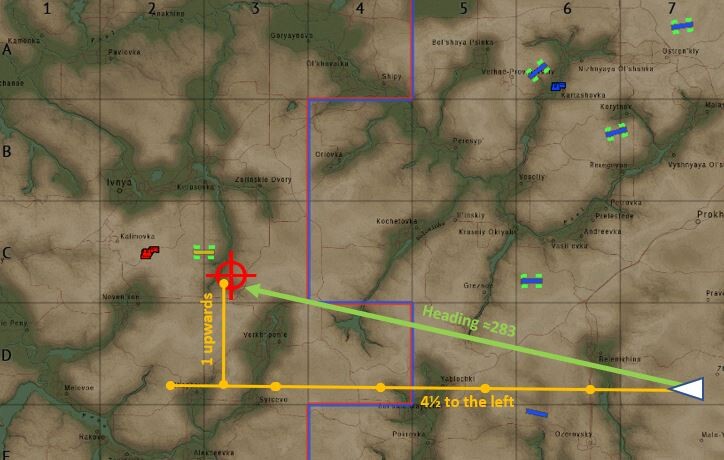
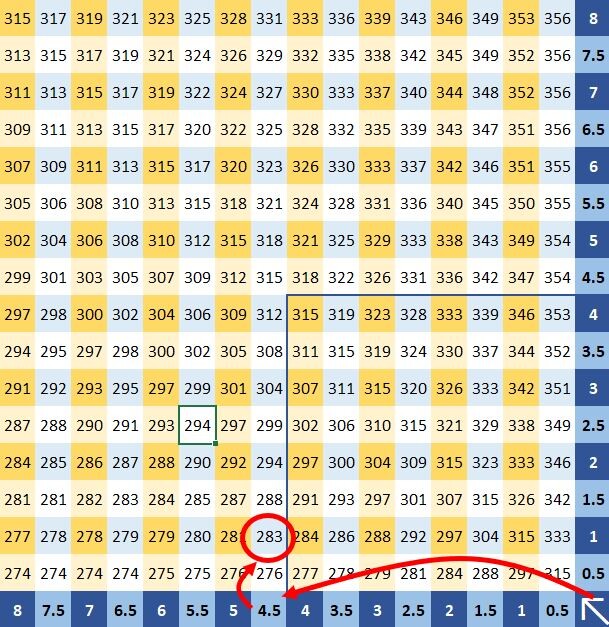
Figured it out, here’s what it looks like.
Haven’t figured out the “release” method, or how to do it.
Which bit are you struggling with?
When to release, as it doesn’t give a specific “number” out to the side that tells me when or how to release them. Also, propped alignment.
If you are flying level, with CCRP enabled, you should just press and hold your release button and it will release at the correct time.
Okay, what about the alignment? Will it “auto-align” or will I have to make sure of that?
You’ll have to do that. Some aircraft have aids for alignment, but some dont. Looks like the AJ37 is one of those that doesnt. So you’ll just have to get a feel for it. The higher you fly, the greater the error though, so flying lower will help… Additionally, you could try a shallow dive onto target.
SAS: Automatic alignment will help with keep your wing levels though.
I finished that match, on Denmark now, is the carrier a target listed?
No, its not unfortunately. Though those are always easiest to attack by flying low in-line with the aircraft carrier to avoid its guns and then dropping your bombs along the length of the deck
Okay, since this aircraft doesn’t technically get a ripple mode, I wish it had a bigger bomb.
Should do. If you use “weapon selection” and then set a setting to change the “Ripple quantity” you should be able to cycle through to “S”. Which is Sequential release. when you press and hold your release button, it will drop all bombs in ripple.
But yeah, bigger bombs do help with the carrier. Buccanneer S2 can take it out in a single pass with its 16x 1000s
Ok, so, essentially, I need to cycle through the targets while in the air?
This isn’t easy since I had 24 targets in my last game on Denmark…
Isn’t there a marker on the map to show which “mission target” is selected??
Yeah, that is the only way to do it. But you can filter it down a bit as the first set of numbers will always be Airfields. On Denmark with 5 AFs (you can always see how many there are as its symmetrical with your own team) 0-19 (4x5 counting from 0 and each AF having 4 parts) will be the AFs. So bases should be 20+.
But yes. The CCRP selection is absolutely aweful. There has been suggestion for improvements in the past. But theyve fallen on deaf ears so far:
The system was added ages ago, back when it was aircraft like the F-105 and its just insuffecient for modern jets
