There is at least one base in Denmark where CCRP does not work, and that’s the one in the south-east, just by the border of a almost circular lake (am at work rn, so can’t say exact grid…).
If you check it in RB (e.g. custom battle, you see that the marker for the base is not at same elevation as the base itself, maybe this screws up the CCRP (as is the case I believe for many higher elevation bases in Afghanistan and Vietnam where I never can get CCRP to work…).
I did just attempt a loft-attack with drag bombs against an Airfield and they did all appear to miss. So when used in this manner. Im going to assume CCRP cannot handle lofting the drag bombs. But I have used them succesfully in a level flight using CCRP. If some are missing, then I guess its the bombs being released sequentially over a larger area than the target. So perhaps try a ripple mode or bomb series mode that releases them all at once.
So, how will I know the target selected is the correct one? You said there will be a “line or cross” I don’t know the specific one for the AJ37, but I assume it will be similar. But how will I know I have the correct selection?
I have no experience with the AJ37 so I dont know what the CCRP symbology will be for it. (there is a chance it may not have any CCRP symbology for the cockpit, some aircraft have CCRP but limited to no symbology for the cockpit HUD)
You should be able to check though, if you point your aircraft at the ground and hit “activate target point” you will create a CCRP target point and you should see the symbology you are looking for (make sure you are in bomb (auto) though to see it.)
Knowing whether you have selected the right target or not though is very difficult and many want an overhaul of the selection method to improve it. As a general rule of thumb though the first 12-20 will be the AFs (4 targets per airfield, so 4x however many airfields there are, maps are always symetrical in that regard)
After that, it should be bases. (note it counts from 0)
Alright, thank you, I have tried in game to figure out how to use it before this, it shows a symbol, but I don’t know if that’s the correct symbol, it uses a “dot and comb” so I assume the “point” selection would be a ring to go around the dot. I have a manual here which might show one of the many HUD displays if it helps you visualize it. See page 13-16. It is the lower half of page 15 to be specific.
In game however, it doesn’t look the same as this one historically. In game it is more like the ones on page 13.
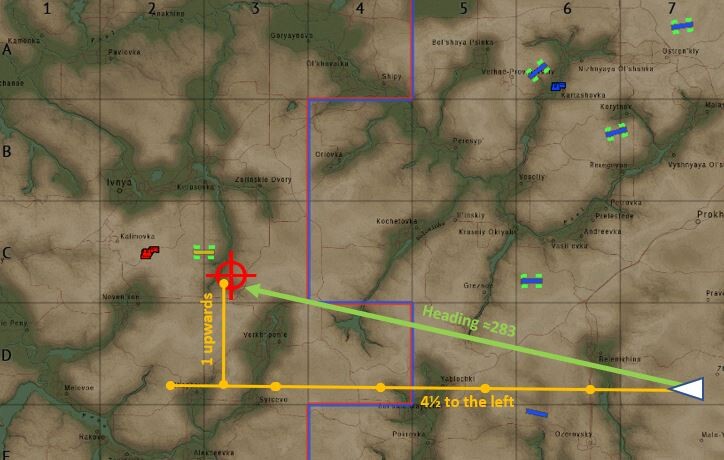
Another way to aid selection of the desired target is to do it at the airfield, before take off. You have access to external view while you’re stationary on the ground, so you get the vertical green line through the selected target showing up in the 3d world. As it can be awkward accurately guessing how many degrees the line is left/right of your nose, and then visualising that guess on the map, it’s best to confirm by taxying to point at the line (get the HUD symbology for a good alignment) and then see that you really are pointing at your desired target.
Beware of other targets on the same bearing, either further away or maybe closer. Even if there are none marked on the map, it is still possible to select targets on an enemy airfield which has not yet been ‘discovered.’
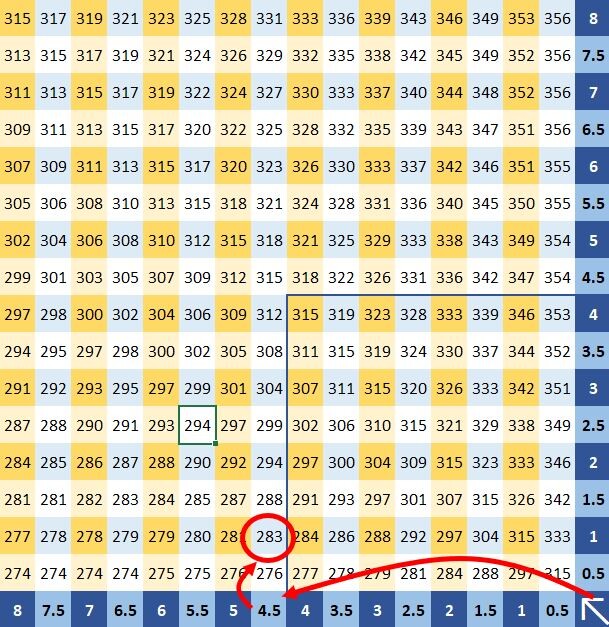
You’ll have to do that. Some aircraft have aids for alignment, but some dont. Looks like the AJ37 is one of those that doesnt. So you’ll just have to get a feel for it. The higher you fly, the greater the error though, so flying lower will help… Additionally, you could try a shallow dive onto target.
SAS: Automatic alignment will help with keep your wing levels though.
No, its not unfortunately. Though those are always easiest to attack by flying low in-line with the aircraft carrier to avoid its guns and then dropping your bombs along the length of the deck