The Su-30SM2s main strengths that allow it to absolutely dominate engagements with any plane in the game if you play it correctly the IRBIS-E radar and its missile kit of 12x R-77-1s which is the most lethal loadout and radar currently in the game and I will explain why and how to use it to never lose to another plane, So the first thing you want to do is bring a FULL fuel tank since you will be like an AWACS and you will be hanging in the back of the map waiting for the perfect time to strike, and bring 12x R-77-1 and 2x R-73s, choose a flat 128km x 128km map like Denmark, Sinai or Vietnam. when you spawn into the match pick a corner airfield and turn on your radar and set it to 100km with the maximum scan width and turn off horizontal stabilization, then sit on the runway for about 30 seconds and manually tilt your radar both vertically and horizontally just to make sure that there is no plane that is close to your airfield or that is approaching your airfield very fast which could surprise you when you take off and put you in a bad situation, Use your TWS to first see where all of the enemy and friendlies are, So with IRBIS-E you can see the entire battlefield from spawn on flat maps like Denmark and Sinai which is what you should be playing with the sm2, and soft lock every single radar contact (both friendlies and enemies) and use your HUD to see their true airspeed and altitude so you can see if you have friendlies engaging enemies or vice versa and you can see if there is some Eurofighter 11,000 meters high heading towards your spawn at an IAS of 1600, in this case you have to wait to takeoff because the moment you take off the Eurofighter which is going Mach 2+ in the stratosphere is going to spam aim-120c5s at you from 50kms out and you will be left trying to defend yourself with a full tank of fuel and 14AAMs, So assess the battlefield with your amazing radar and NCTR while you wait to takeoff to see where everyone is and if it’s safe to take off, once you see it’s safe to take off, (so this would be if all of the enemies are around their airfields and are at low alt or they are busy in an engagement with your teammates), then when you take off instantly start flying towards the friendly airfield which is on the other side while climbing at about maybe 30 degrees, and tilt your radar so it faces the battlefield, this way you are safely protected by your Ito-90s as well as teammates who are taking off while you can safely climb and assess the battlefield with your beautiful 240 degrees of awareness and constantly use your MFD and HUD to see the positioning, speed and heading of everyone, So now you just keep climbing until you reach an alt of 8, 000 meters for map like Denmark but you can go to about 10,000 meters on Sinai, and here once you have climbed to altitude you want to just chill at the back of the map near your airfields going back and forth like an AWACS and see everything that is happening with your radar so you can just fly back and forth your airfields while being able to see the entire battlefield, and you must learn to read your instruments well and keep track of what’s happening so you can strike at the perfect time, let me give you an example, So you’re at an alt of 8000m going about Mach 1.6 back and forth between your airfields and you see on your radar that there is an enemy F-18 that is 80km away which is multipathing at 40meters and its completely alone so you soft lock the contact on your HUD radar which will show you the target identification of the plane as well as its true airspeed and real alt) so turn your nose to the enemy F-18 and get your alt and speed up as much as you can before you engage so you can give your R-77-1 more energy, when the target is at roughly 50km away then point your nose up to a steep 40 degree incline, and fire just 1 R-77-1 to poke at him, the reason I lift the plane’s nose to 40 degrees is so I can manually loft the missile so when the missile lands it is going to drop on him from vertically above which is what counters multipathers, but the moment you launch that missile you need to start turning away until the contact is in the very corner of your radar and also before going defensive you must narrow the scan width so you can have the fastest scan rate and less chance of losing the contact since when IRBIS-E is being tilted all of the way to the side it has a tendency to lose lock, So then you want to fly away from the F-18 while the F-18 is in the very corner of your radar, so you will be supplying datalink to your missiles while you are flying away from the F18 and while you’re flying away you will see what the f18 will try to do to defend your missile, usually they will keep flying straight towards the missile because they think that because they’re multipathing that the missile will just splash next to them and they will be fine, but we lofted the manually lofted the missile from a long distance so the missile is going to hit them from straight above like a lightning strike, But let’s say the f18 knows better and actually tries to defeat the missile kinematically or notch it, then your shot of course has 0 chance of hitting since it was fired from like 60km, so just turn the opposite way you are facing while still keeping the F-18 soft locked in TWS and fire another one when your nose lines up in the direction of the f-18 then keep turning the way you were turning until the f-18 is in the other corner of the radar (so you are flying away from the f18 then quickly turn to him to fire the missile and then keep turning so that when you’ve fired the missile you can keep flying away while supplying datalink to the missile and all of these missiles are coming from different vectors which makes it harder to defend against (the entire time the F-18 needs to be soft locked by your radar so never do a complete 180 where the radar loses a lock and you need to reacquire because you always need to know what direction alt and speed they are and most importantly you need to supply datalink to the missile since your shots will always be like 3x the range of pitbull) , so at this point you are flying away from the f-18 and its still in the corner of your radar and you can see that he’s actually going to evade the missile, then turn and face the f-18 so and fire another and then keep turning all the way so that the f-18 is now in the other corner and you can keep repeating this while slowly closing the distance with him but never get closer than 30km because you never want to be in a situation where the only way of defeating a missile is notching, you need to always be able to kinematically defeat a missile so never ever get in the NEZ of any plane, and in this situation where you are constantly firing a new missile and turning around and flying away while he is forced to defend the missile he will eventually just get hit by an R-77-1, This whole dance of turning far left and then far right and popping off a missile in the middle of the turn also helps bleed the energy of any AMRAAM which is constantly readjusting its trajectory steeply as you F pole, so even if thje target launches from far away, and if you get the pitbull alarm on your RWR it’s not an issue at all since you know the missile is going to already be very low on energy and you can still supply DL to your R-77-1 while kinematically defeating their missile which no other plane in the game can do.
Also you want to target mainly F-18s and Rafales since they will be the easiest kills because the F-18 does not have the flight performance to make its aim-120s lethal and its flight performance is horrible but the rafale is probably the easiest food for the flanker since the MICAs range is so pathetic, fighting the rafale is like if 1 person was armed with a long spear and the other had a combat knife. Don’t come close to it and keep poking it with R-77-1s from afar while closing distance every F pole you do you’re going to be poking them with R-77-1s from long ranges and supplying DL to the missile while they defend and you can quickly turn back to them and fire another while closing the distance but not within 20km
also, this protocol can work on multiple enemies at once but it’s just riskier to do and if I have multiple enemies on my radar, I will fire at all of them and then fly away while supplying datalink and hope some of them hit,
Also before I mentioned how important it is to read MFD and HUD, So using your MFD you can see friendly NCTR Aswell as enemy NCTR, The basic radar you have that everyone gets on their screen doesn’t display friendlies NCTR so you don’t know if that friendly is just a bot or an actual valuable teammate who can put pressure on an enemy jet and let you take them out while they’re busy defending from your teammate, so use your MFD to look at your friendlies and see if your friendlies are brawling with any enemies, if you see that your friendlies are in a fight then launch some R-77-1s at the enemy and it will help your friendly a lot by either making the enemy have to defend from another angle or your missile could just take them out since they could be busy notching your friendlies missile
Also just on some general tips also to dominate even harder I understand people also have trouble dealing with the iron dome meta so there is also a simple trick to dealing with that that works on any plane, You simply just launch the missile from lots of vectors (from distance of course) launch one while your plane is pointed up at 20,30,40 degrees and different vectors, just make sure your missiles are coming from loads of angles and that some of them need to pull really hard into the enemy so if the bearing of the enemy plane is 200 and you’re also flying at a bearing of 200 facing them then turn to face bearing 300 and fire a missile while also manually lofting it.
Also let me teach you how to read the HUD correctly and also how to read the cockpits radar and RWR as they give extra info that you would of missed out on a lot on if you didn’t know about them.
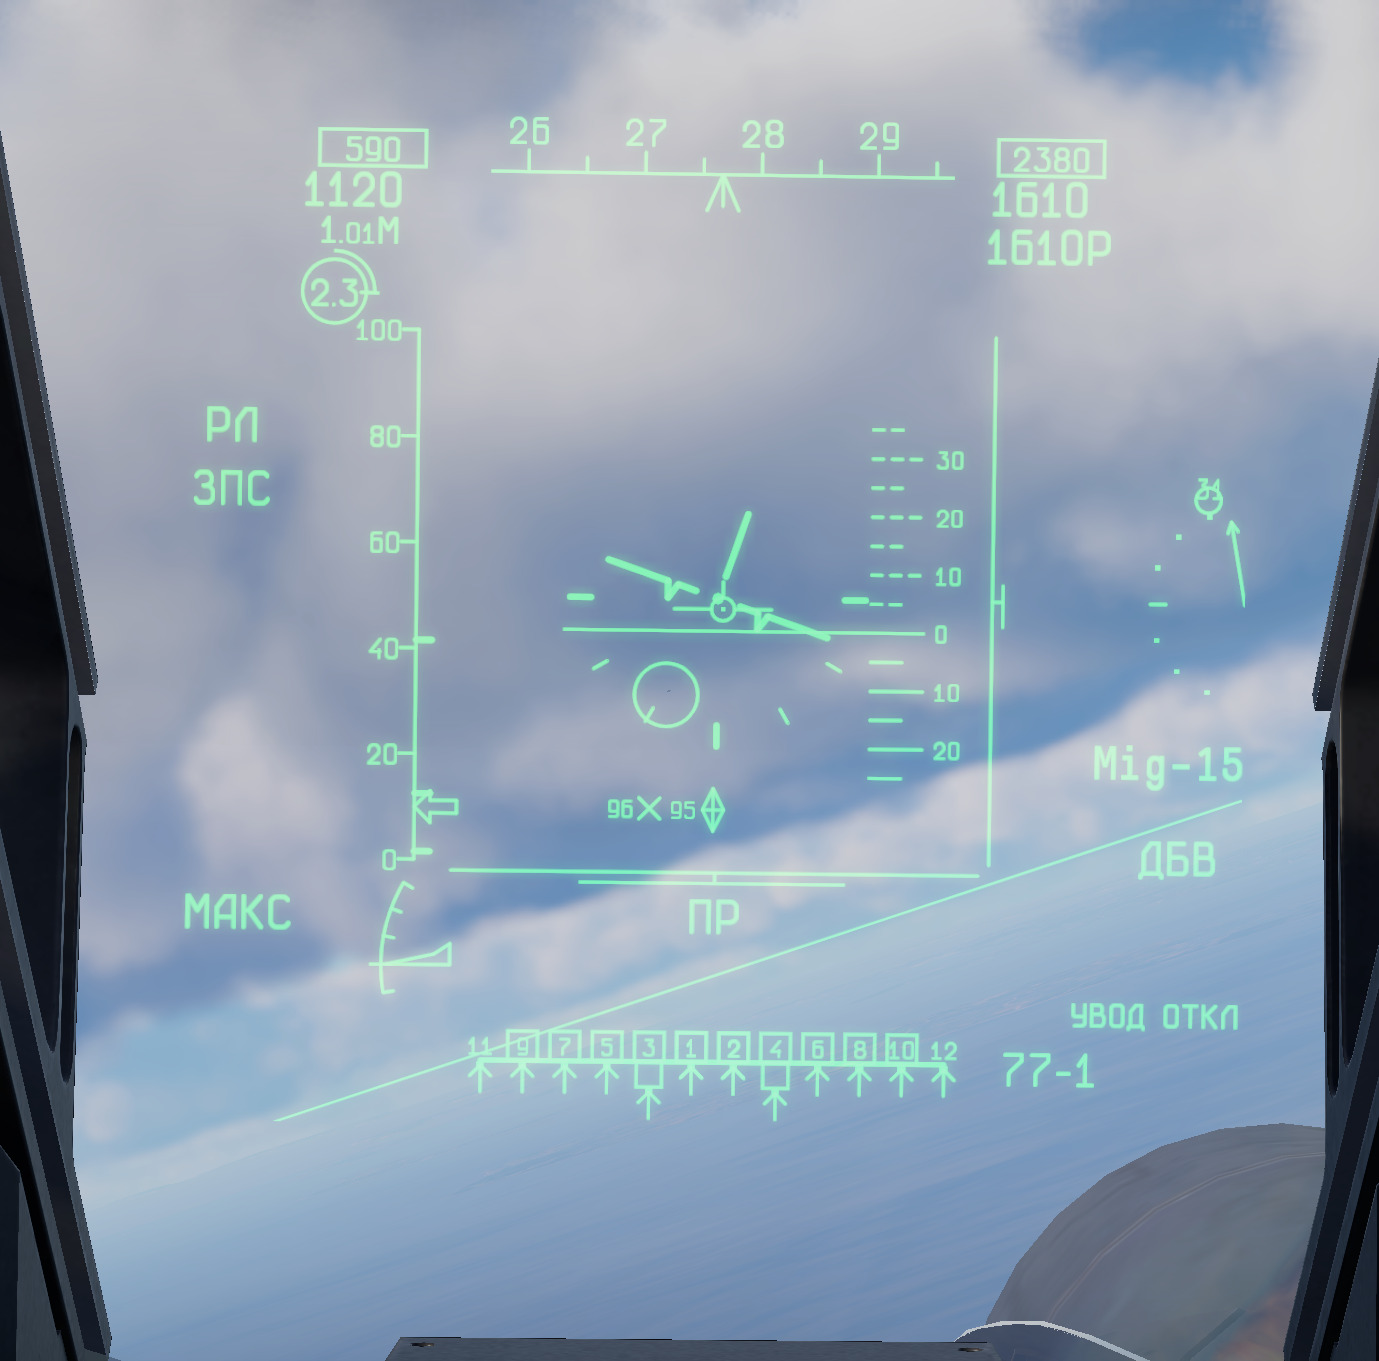
Lets start of with the top 2 boxes at the top which are highlighted which are sitting on the edges of the bearing compass, which show the numbers “590” and “2380”, the highlighted box only appears when you lock a target and it shows the targets indicated airspeed and true altitude, while the right highlighted box shows the true altitude of a target and also only appears when you lock a target. then underneath the left highlighted box you have your own Indicated airspeed Aswell as your speed in Mach, underneath that you have the Gs of force you are experiencing, and underneath the targets altitude on the right it shows your true altitude and your radar altitude, The radar attitude has the P at the end of it. Then moving to the radar function of the HUD, You get a big empty square with has 0km up to 100km marked on the side of it, this is your radar screen which has been put onto your HUD, You get a target selector to select a target and that will show you their alt/speed and it has NCTR so when you select a target it will tell you what plane you are locking, which is incredibly useful, with this tool you know exactly what missile you will be defending and you will know how to approach the target, Because of course with a Typhoon AESA you will need to be much more cautious than a F-18 for example. Then on the right of the box it shows you the horizontal degrees, so now we look inside of the square, we can see there is 2 contacts which have an NCTR ID number of 96 and 95, We can see that the distance is a little under 10km away because on the left of the box there is a 0-100km distance chart written, and when you lock a target the arrow will adjust itself on the graph to show you how far away the target is. On the right where it says “MiG-15” that is the NCTR, if you lock any target it will show you what plane they are in, So if you see a contact on your radar and want to know what plane they are flying in, just hover the selector over the radar contact on your HUD and it will tell you if it’s an F-15 or F-16 or F-18 etc, But it can not provide an exact model of the plane. we can also see underneath the radar on the HUD there is a curved line with a wedge that looks like the speedometer in your car, this is just displays the angle of attack that your plane is currently experiencing, and for the HUD you can see a “np” underneath the radar section of the HUD and this is just Russian abbreviation for “launch allowed” when you see the little “np” or hear rita tell you “Poosk Razhryshon” it means the R-77 or R-73 is already spooled and ready to be fired.
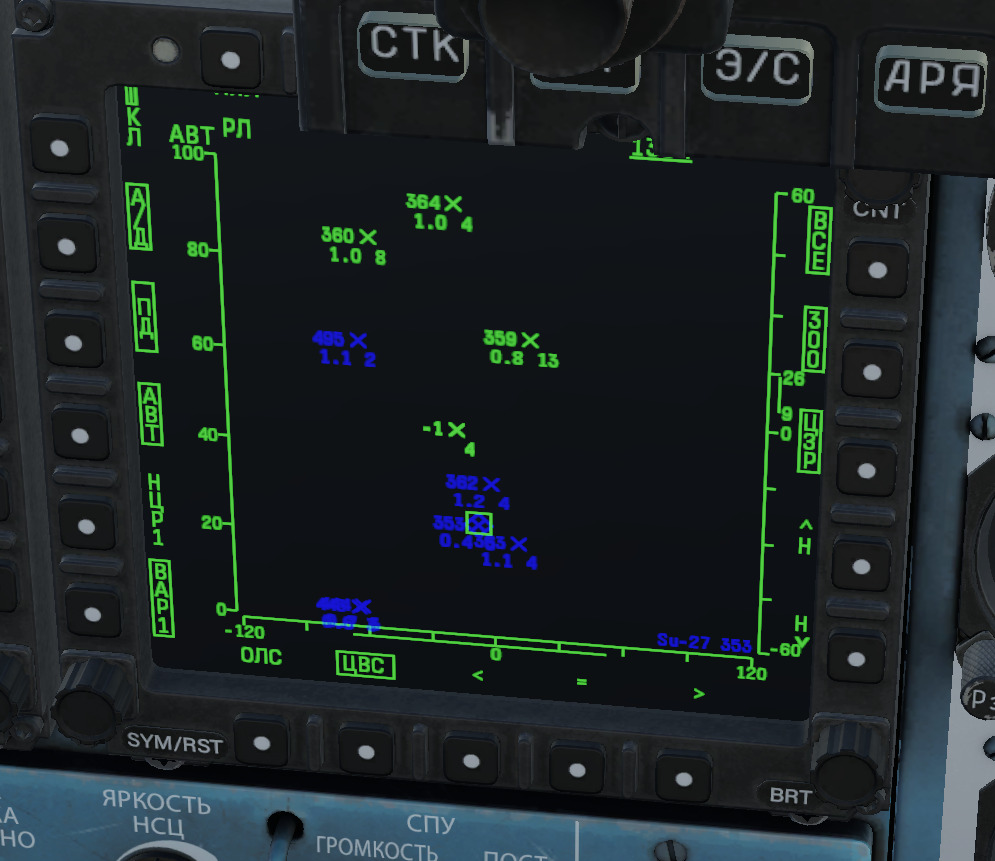
The radar in the cockpit is very useful because it displays the target identification of friendlies, which will give you a much better understanding of the battlefield and let you go into an engagement with more understanding of the situation, you can see if an enemy is pre occupied with a friendly when you have friendly NCTR and you can support the friendly
Hope you learn something new from this and improve your experience in the Su-30SM2