My main goal with this tutorial is to show people how to play good. The issue is, that most players in this mode are really, really, really, extremely, truly horrible. So horrible in fact, that many of them are incapable of producing a positive K/D even in this mode.
This tutorial is not mainly for those players, but for the moderately bad and better ones. Of course, the really bad players can learn from this as well, but their success is going to be less, if any.
So, why would anybody even play this mode?
-
Daily rewards
You can get 2 thigs after a successful match, either a booster or universal backup, 2 universal backups, or 2 boosters. The boosters are either 300% RP or SL.
For defeats, you only get one of them, and if it is a booster, youw will get a worse one. Therefore the victory is a preferred outcome. -
Getting early modifications
Especially at top tier when your stock shell is useless HEAT, you can get the early dart in this mode, as well as some other essentialls, like parts, FPE, etc. -
Spading tanks you don’t want to play in PVP matches
There can be a few reasons for this. You don’t like the tank, the playstyle, things like these. In this mode you can over time spade most tanks, tho there are exceptions. I will later talk about this more.
In the last 2 cases, aim for victory is also very important. During a loss, even is you lose at the last stage, the RP reward will be basically nothing compared to a victory.
Some quick quides for RB players
While things will be roughly the same in this mode, there are a few things to consider.
-
Tanks get a boost in mobility and gun handling.
You will notice your tank being faster, and more agile, which is in general good. But don’t expect generally slow tanks to become fast, that will not happen. -
The pen indicator lies
Many times the indicator basically lies to you. Either showing that it will pen, when in reality it will not, or in the other way. generally rely on the weak spots you have learned.
I will make a quick guide on the enemy tank weak spots, but it is better if you already know them. -
Crew replenishment automatically triggers if you are on 1 crew
You not only can activate it anywhere (not just in friendly cap points), but it will automatically trigger if you are on 1 crew. This mechanic will however not be used for reasons i will explain later.
General things you need to know:
-
There are 12 waves, during which 3 groups of enemy bots try to capture your base. They start far, and slowly approach, and they shoot on the move. Your goal is to prevent them from reaching the base.
Your base is indicated by a white square on the middle of the map. This is the area where you respawn.
If a bot is inside this area, your tickets will start to bleed out. After each successful defense, you get back some, but do not expect a lot. It is best to avoid losing tickets at all.
The number in the left bottom of your screen indicates how many waves are remaining. -
Bots shoot on the move.
This would not be an issue, BUT. Every single bot transforms themselves into Vasily Zaitsev and will snipe you out on the move from over a km. This is not a joke. Bots are extremely accurate on the move, and will hit your weak spots from really far away, even on the move.
However, there are workarounds of this, and i will detail them on every map. -
Bots don’t burn.
If you set one on fire, they will not burn out, nor do they stop to put the fire out. They will repair modules at least, and they stop during that (but only if the module is engine, transmission or tracks). They don’t repair barrels. -
Bots lag.
You will see it from their movement. Hitting them at longer ranges can be hard due to this sometimes. You will get used to it, and you will know when the bot is actually at the spot where graphically it is. -
Sometimes bots start to spin like crazy, or just fly away.
This is a bug, usually when a player vehicle collides with them. But bombs can also cause this.

-
Bots can get stuck.
Mostly due to bombs, buts can get stuck. In that case, just go to them and kill them. Generally this is a good thing, because you have to worry about less of them actually attacking. -
You can bring full ammo.
Bots aim for ammo anyways, regardless of how many you actually bring. And, this is the bigger reason, by knowing where to go, you can avoid getting killed a lot. Bringing full ammo makes you less dependant of resupplies, that are on the middle of nowhere, making you die less.
The levels
There are 6 levels, with the following BR ranges:
Level 1: 1.0-2.3
Level 2: 2.7-3.7
Level 3: 4.0-5.0
Level 4: 5.3-6.3
Level 5: 6.7-8.0
Level 6: 8.3+
There is also enemy CAS. You can use SPAA against them since they fly in a straight line, but only do it if your team is able to hold the enemy tanks. Also try to bring SPAA that is effective against tanks too.
On the other hand, you can also use planes. Try to bring bombers, and always bomb the more dangerous groups. They will be explained in a map by map case.
Crew replenishment, dying, respawn, repairing.
DO NO BE AFRAID TO RESPAWN
I REPEAT:
DO NO BE AFRAID TO RESPAWN
If you are low on crew such, that it affects your reload time, just RESPAWN. Do not waste your time with crew replenishment.
The only time you should do it, and avoid respawning is when you are at the end of a wave, and the enemy does not pose any danger, or you can pick up a resupply. The resupply pickups are floating above the ground. They fully resupply your tank with ammo, repair all damages, and heal all your crew. They also give a charge of FPE and crew replanishment (and you can have more of them than their “maximum”. You can get for example 5 FPE and 3 crew replenishment. Their number is increased by 1 each time you pick up a resupply).

If your ability to shoot is lost, because of barrel and/or breech damage, you must do the following:
- If there are no enemies posing danger (only a few are remaining and they are far away), then repair.
- If only your breech is damaged, you can still shoot, just wait for the automatic repair (just a few seconds), while triggering your normal repair. You can shoot wile repairing.
*If your barrel is taken out, and there are nearby enemies, RESPAWN.
Yes, respawning takes aways tickets, but the ticket bleed from enemies capping is very fast, and you will lose. Do not be afraid to respawn.
Also, what i mean by “enemies posing danger”?
If a wave just spawned, and they take your most of your crew and/or barrel, that is danger. RESPAWN!
When there is just a few remaining, and they won’t reach the base, you can take your time.
IF YOU CAN’T PEN THEM, SHOOT THEIR TRACK!
This is so simple, yet not many know it. Even if you can’t pen them, at least be useful and track them.
Use your spawn protection!
If you respawned, but there are enemies right at the base, and aiming at you, don’t even dare to move! Stand still! You have 20s spawn protection. USE IT!
Take out as many enemies as you can!
Focus the closest!
If you move, you will lose the spawn protection, and die immediately!
If you were standing still, and the spawn protection expired, you are free to move. Most often you will instantly die after it expires, but sometimes you can get to safety. If there are no enemies that you can see, then of course move as you want.
But most importantly:
DO NO USE SMOKE!!
DO NO USE SMOKE!!
DO NO USE SMOKE!!
DO NO USE SMOKE!!
NOT ONLY DO BOTS SEE THROUGH SMOKE, BUT YOU, AND YOUR TEAMMATES CAN’T. iF YOU USE SMOKE, YOU ARE SABOTAGING YOUR TEAM, AND YOU SHOULD BE PERMANENTLY BANNED FOR MATCH THROWING
Now, for any reasonable player, it would be obvious, when bots try to shoot you through rocks, solid buildings, that they constantly see you. And when you pop smoke, and still get hit, you should know that smoke is not just useless here, but also damaging. But sadly, most players in this mode are germany mains. And they are incapable of understanding such concpets. You will see more smoke in a single match than you’d see in every forest fire and volcano erruption in Earth’s history COMBINED.

Make sure to report every player using smoke.
Also, it is best to remove the smoke modification if you have, so you won’t accidentally pop one, or have the launchers get shot.
LISTEN TO PLAYERS ON TOP
If you are on, or around teh bottom of your team, listen to the top players. They know it better. If they tell you to do something, YOU DO IT. DO NOT ARGUE WITH THEM. They are better, and they know what they are doing. They will ask you to do something so the team can win. It benefits everyone.
READY RACK, RELOAD TIME, AND DAMAGE
In the later stanges, roughly rank 3 and above, these things will matter a LOT. Generally, try bringing tanks that have no ready racks, or have large ones. Especially at last levels.
One other thing, try to use tanks, that have fast reloads even without having ammo in ready racks.
CM11 is a good example. It has 33 ready rounds, and the reload is also fast even if it is empty (comparable with ready rack reload times of other tanks with 105mm gun).
Another examples are the Challenger MBTs. Despite 3 or 4 ready rounds, they are the same as the CM11, they have fast reloads even without ready rounds.
At all cost, avoid Leopard 2s, since they have only 12-15 ready rounds, with an abismal 30s empty ready rack reload.
Also avoid derp guns, such as KV-2, Sturmtiger, anything with soviet 122mm, since they have long reloads.
Autoloaders can be useful, but you must stay in, or very near the resupply area.
In general, try using a tank that can reliably 1shot any enemies you will see. At low levels, this means tanks with APHE (avoid solidshot, APCR, HEAT, HESH). Solidshot can be good, but then it must have a fast reload.
Use T-64s/T-80s isntead of T-72s/90s, since they have faster reload (T-80s) and more ready ammo, as well as better reverse speed (on the T-80s)
And now, let’s talk about the maps. I will detail each of them, first the map itslef, and key positions on it you can take, and then the enemy vehicles.
Ardennes
In general one of the best maps. You will usually go to a few positions that are easy to memorise. These positions can also cover most of the map.
But first, where do the enemy come from?

These are the routes that they roughly take.
The number next to them is an indication about the priority you must take.
1 is the most dangerous, and 6 is the least.
Group i will stop there, amking it hard to take them out, since you will likely be in a crossfire. Therefore take them out as fast as you can.

Group 2, 3, and 6 are easy to counter from 1 well protected spot (where my tank stands in the screenshot, marked with green). 2 and 3 will be in hulldown, but they can be easily taken out.
6 is not that dangerous, because due to some bug, just a few (if any) of them will cap. They just stop before they would reach the cap. This is also true for some of group 3 as well.
Group 4 and 5 will go on open field, so they are also easy to take out.
Where to go?
My go to spot is where i am, but this picture will illustrate it better:

You can go a bit further, especially with a faster tank that can get back fast. This position covers 6 more.


Another position is using the covers near the buildings at spawn. They are great to counter 5 and 1, but gets hard countered by 4. Use only if there are no enemies at 4.


To avoid this, you can take a different position. This mainly counters 1, but also 5 and somewhat 4.
However, this position is hard countered by 2 and 3.


This position can also be useful, but generally inferior, since it can’t counter 6, and early stages of 3:

And now, let’s see what enemy vehicles you will encounter:
Level 1:

Well, if you excuse me, i will only talk about the M3 Lee, since the rest of them are paper.
Just shoot these spots:


What tanks to bring, and what to avoid:
Well, since it is level 1, it is the easiest one. Bring anything you want, that can actually pen all of these tanks.
Level 2:

The M4 and the M4A5 can be tough, but here are some general weak spots you can exploit on them:


Tanks to use: Anything with ~100mm pen will be good. Use APHE, so avoid bri’ish and french tanks.
Soviet 76mm guns will also be useful thanks to their angle pen.
Level 3:

Even easier than the previous one. None of them will have any kind of armor, and they will be 1shotted by pretty much anything.
Level 4:

This is also not that hard. The M26 and T26 can be challenging, but here is where to shoot:


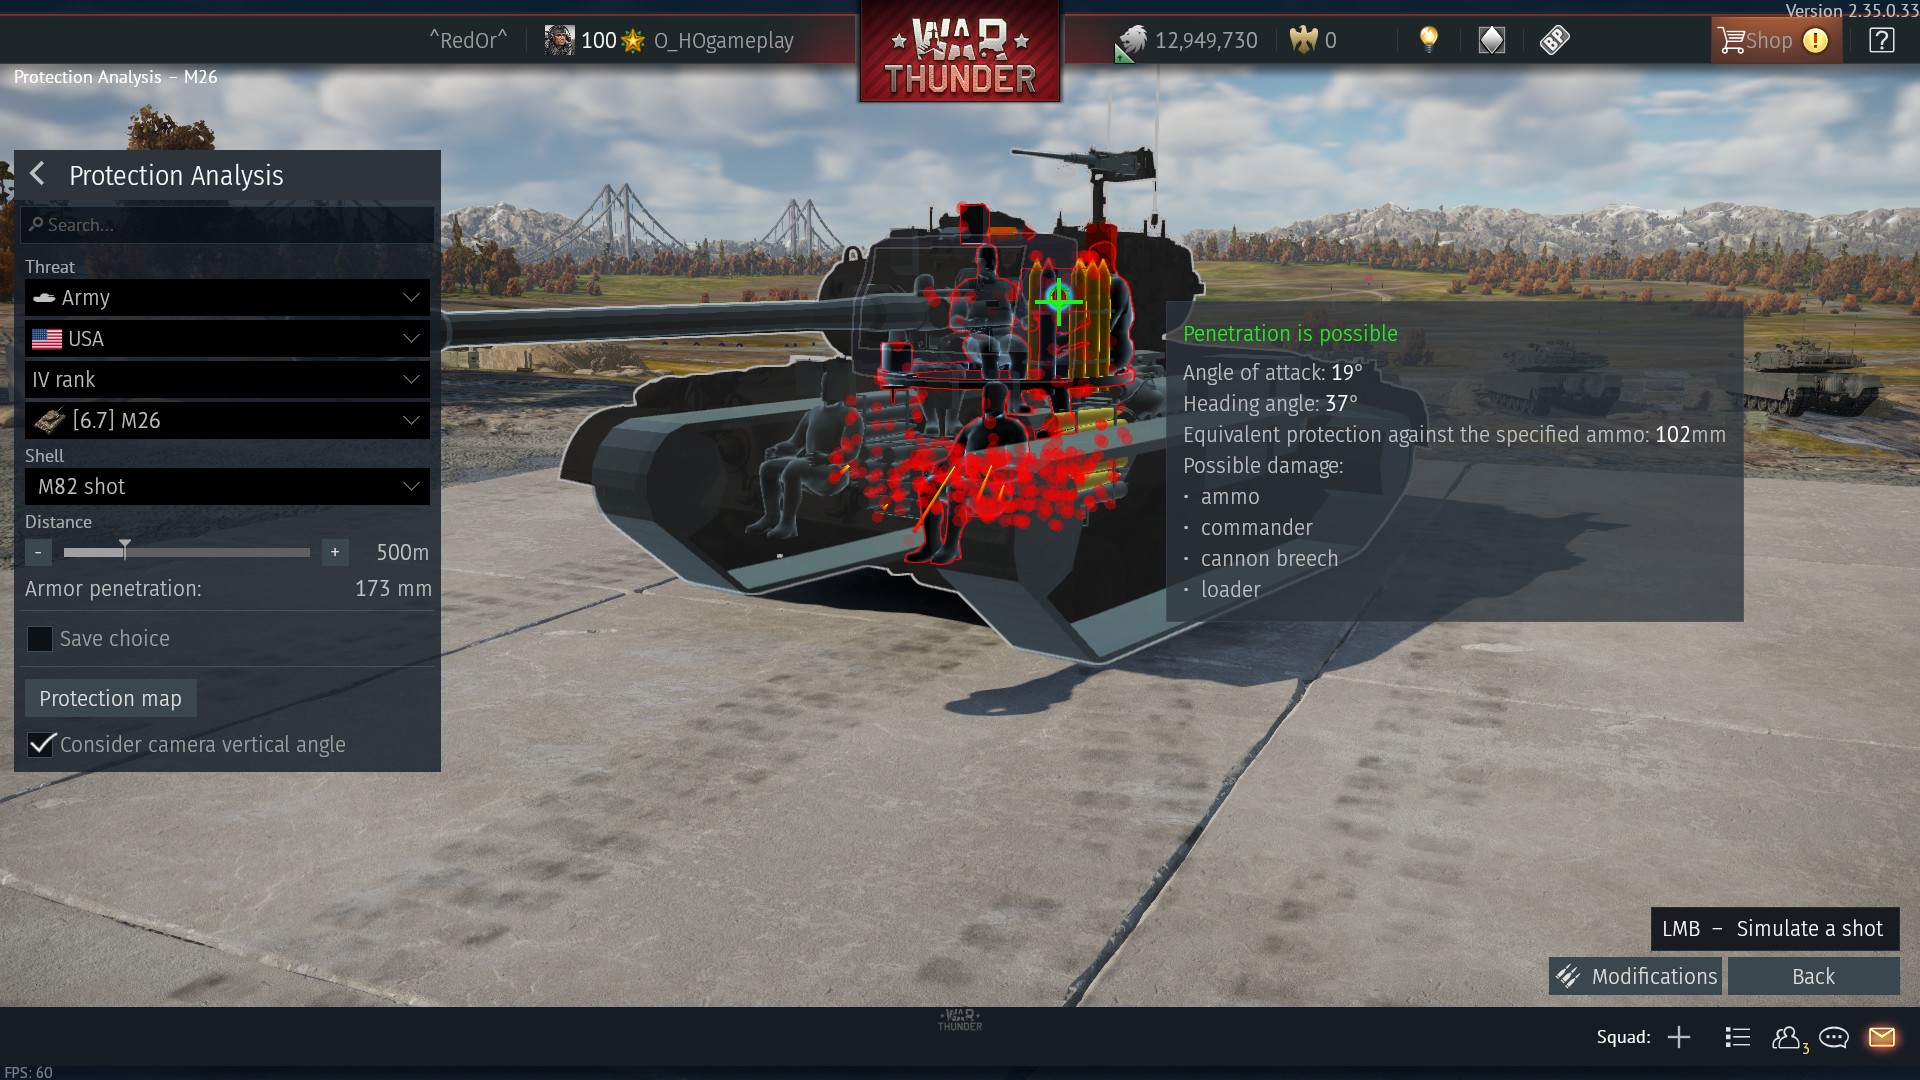


Anything with APHE and under 10s reload will do it.
Level 5:

M46 is the same as the M26.
M47 is paper, and the T32 can be easily penned:
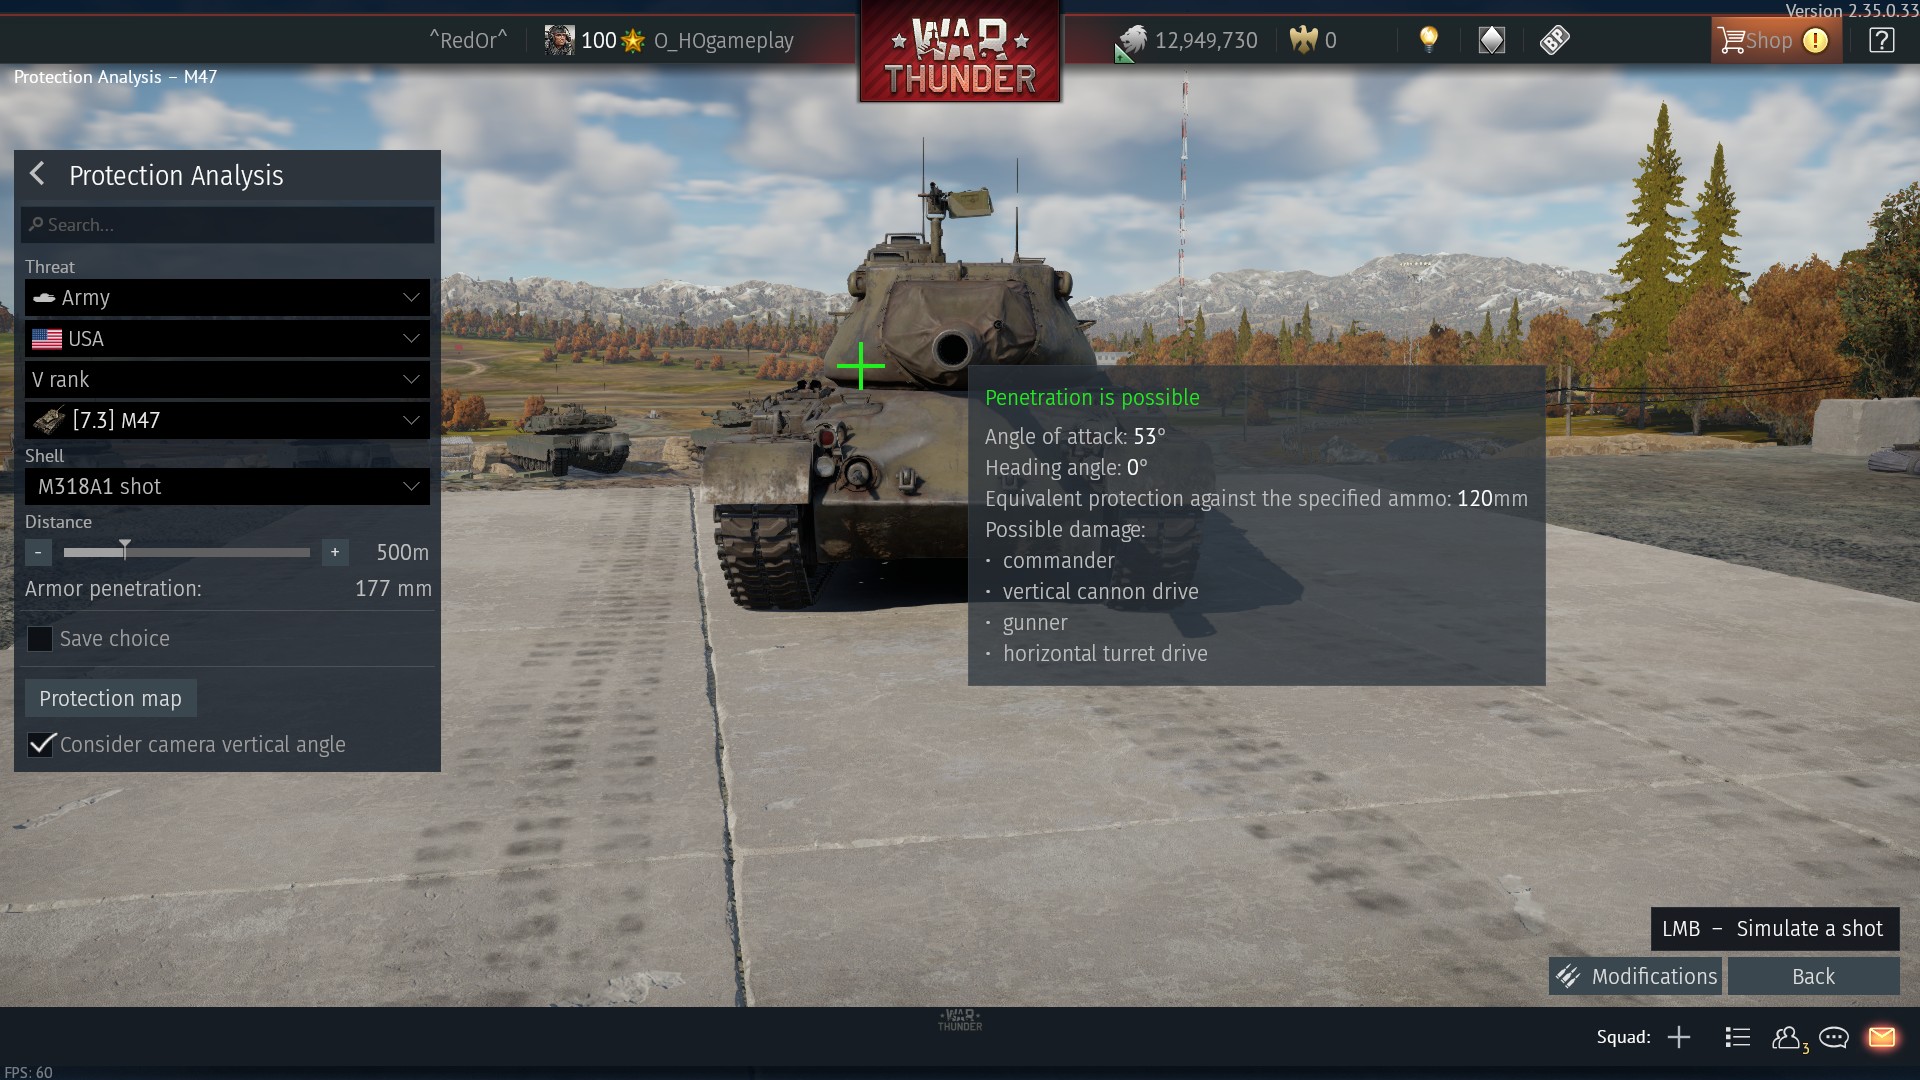


If you use HEAT/APDS/APFSDS, shot their lower plates for an easy ammo rack.
Here, APHE is not the best option, but still usable. Here use the above mentioned shells.
Any 300mm+ pen HEAT will do it, as well as any NATO APDS (avoid soviet 100 or 122mm APDS, but chinese 105mm APDS is good), and any APFSDS, even the ones on the M41D, ZTS63, and Type 69.
I recommend the Vickers Mk 1, Type 59/69, T-54, M48, Strv 103.
Level 6:

Anything with APFSDS will do it. Just shoot the neck on the Abrams, and one of the many ammo racks on the M60/T95.
I recommend CM11, Challengers, Abrams, soviet/chinese MBTs.
Japanese/french autoloaders can work, but you will need to catch a lot of resupplies to refill your autoloaders.
I will release the rest of the maps tomorrow.